Learn how to fix orange hair with the right toner and maintenance tips. Get step-by-step instructions for mixing and applying toner. Achieve your desired hair color.
Understanding the cause of orange hair
Contents
Understanding the cause of orange hair
Understanding the cause of orange hair
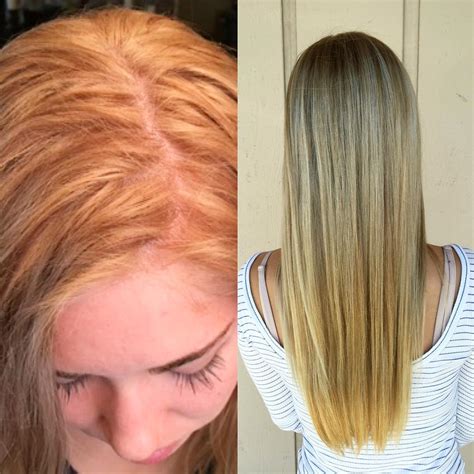
When it comes to coloring your hair, especially if you’re going from a darker shade to a lighter one, dealing with orange tones can be a common issue. Understanding why this happens is the first step to fixing it. The main cause of orange hair after bleaching or coloring is the underlying pigment in your hair, which is red and yellow. When you lighten your hair, these pigments are exposed, resulting in the unwanted orange hue.
Another factor that can contribute to orange hair is using the wrong developer or leaving the bleach on for too long. If the developer is too strong or if you leave the bleach on for too long, it can strip away too much of the natural pigment, resulting in orange tones.
It’s important to keep in mind that everyone’s hair is different, so the underlying pigments that come through when lightening can vary from person to person. Factors such as the natural color of your hair, previous color treatments, and the condition of your hair can all impact how your hair will react to the lightening process.
In summary, the main factors contributing to orange hair after bleaching or coloring are the underlying red and yellow pigments, the strength of the developer used, and individual variations in hair color and condition. By understanding these causes, you can better prepare for the toning and correction process to achieve your desired hair color.
Choosing the right toner for your hair
When it comes to choosing the right toner for your hair, there are a few key factors to consider. The first thing to assess is the current state of your hair. If your hair is brassy or orange, you’ll want to opt for a toner with cool or ashy undertones to neutralize the unwanted warmth. On the other hand, if your hair is too yellow or pale, you’ll want to choose a toner with warm or golden undertones to add some depth and richness to your color.
Another important consideration is your natural hair color and the level of lift or lightness you’re aiming for. If you have dark brown or black hair and are looking to achieve a light blonde or platinum shade, you’ll need a toner with strong lifting abilities. Conversely, if you have light blonde hair and are simply looking to tone down any brassiness, a gentler, less intense toner will suffice.
It’s also crucial to take into account the brand and formulation of the toner. Look for reputable brands that offer a wide range of toning shades to ensure you find the perfect match for your hair. Additionally, consider the type of toner – whether it’s a permanent, semi-permanent, or demi-permanent formula – and choose one that aligns with your desired level of commitment and maintenance.
Lastly, don’t forget to consider the condition of your hair. If your strands are already dry, damaged, or in need of some extra TLC, opt for a toner that contains nourishing and conditioning ingredients to help improve the overall health and appearance of your locks.
Preparing the toner mixture
When it comes to preparing the toner mixture for your hair, it’s important to follow the instructions carefully to achieve the desired results. Start by gathering all the necessary tools and ingredients, which include a plastic bowl, gloves, a brush for application, and of course the toner itself. Make sure to read the directions on the toner packaging, as different brands may have slightly different mixing instructions.
Next, carefully measure out the developer and toner according to the recommended ratio. This is typically a 1:2 ratio, meaning one part developer to two parts toner. Pour the developer into the plastic bowl first, followed by the toner, and use the brush to mix them together until you have a smooth and consistent mixture.
It’s important to use the right developer volume for your hair. If you have fine or delicate hair, a 10-volume developer is usually sufficient, while thicker or coarser hair may require a 20-volume developer. Be sure to check the toner instructions for specific recommendations on developer volume.
Once the toner mixture is prepared, it’s best to use it immediately to ensure the most effective results. Apply the mixture to clean, damp hair, starting at the roots and working your way down to the ends. Be sure to saturate the hair evenly and thoroughly for consistent toning.
Applying the toner to your hair
Once you have prepared the toner mixture according to the instructions and have done a patch test to ensure it is safe for your hair, you are ready to apply the toner to your hair. Before starting, make sure to put on old clothes or use a towel to protect your clothing from any drips or spills. It’s also a good idea to apply a layer of Vaseline or lotion around your hairline and on your ears to prevent staining from the toner.
Start by dividing your hair into manageable sections, using clips to keep them separated. Begin applying the toner from the roots and work your way down to the ends, making sure to saturate each section evenly. Be sure to massage the toner into your hair to ensure full coverage.
Once the toner is applied, leave it on for the amount of time indicated in the instructions. This is typically around 20-30 minutes, but be sure to check the packaging for specific time recommendations. While the toner is processing, it’s a good idea to gently comb through your hair to make sure the toner is distributed evenly.
After the processing time is up, rinse out the toner thoroughly with cool water. Follow up with a color-safe conditioner to restore moisture to your hair and prevent any potential damage from the toner. Once your hair is rinsed and conditioned, you can style and dry it as usual to reveal your newly toned hair.
Maintaining your newly toned hair
Congratulations on successfully toning your hair and achieving the perfect shade! Now that you have your desired hair color, it’s important to maintain it to keep it looking fresh and vibrant. Proper hair care is crucial to ensure that your newly toned hair stays beautiful for as long as possible.
Start by using a color-safe shampoo and conditioner to prevent your hair color from fading. Look for products that are specifically formulated for colored hair and be gentle when washing and conditioning to avoid stripping the color.
In addition to using color-safe products, it’s also important to limit your hair washing frequency. Washing your hair too often can cause the color to fade more quickly. Try to space out your hair washes and use dry shampoo in between to keep your hair looking fresh without having to wash it as often.
Another key aspect of maintaining your toned hair is protecting it from heat and sun damage. Heat styling tools and prolonged sun exposure can cause the color to fade and become dull. Use heat protectant sprays and wear a hat or use UV protection products when spending time in the sun to preserve your hair color.
Finally, consider getting regular touch-ups to maintain your hair color. Over time, your hair will naturally grow out and the toned sections may become lighter or develop regrowth. By scheduling regular touch-up appointments, you can keep your hair looking freshly toned and vibrant.

